- The polyphosphate crystal filter is well-suited for domestic use.
- It safeguards household appliances such as washing machines and dishwashers by preventing calcium deposits.
- It is suggested to replace the filter when the internal material level decreases to 1/3 of its original amount.
- The Active Carbon filter is specifically crafted for treating water.
- It effectively removes the strong taste of chlorine and other impurities from water.
- Replace the filter as required, but do not exceed a 6-month interval.
- If using the filter for drinking, make sure to disinfect it.
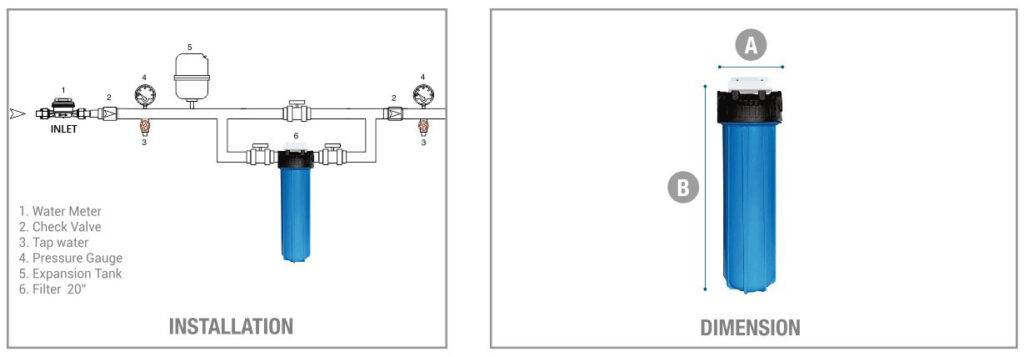
- Length: 20″.
- The active carbon block filter is specifically crafted for the treatment of drinking water.
- Reduce the strong taste of chlorine and eliminate additional impurities in water.
- The filter provides filtration at a 5-micron level, effectively eliminating small water particles.
- Replace the filter as required, but do not exceed a 6-month interval.
- If using the filter for drinking, make sure to disinfect it.
- Length: 20".
- Disposable cartridge with wound wire for mechanical filtration.
- Carded Polypropylene thread wound on a core made of the same material.
- Dual Antibacterial effectiveness with silver treatment on both the wound and core.
- Suitable for a variety of filtration purposes.
- Length: 20" (x3/4" - 1") F
- Environment friendly
- Eliminates existing scale in the system
- Catalytic process transforms calcium (Ca) and magnesium (Mg) into harmless microcrystals
- Maintenance-free with no additional costs
- Space-saving solution
- Easy to install
| Model | WSNAC20 |
| Description | Scale Prevention Filter |
| Flow Rate (Lt/min) | 16 |
| Connections | 1″ |
| Operating pressure (bar) | 1,5-8 |
| Operating temp. (°C) | 5-50 |
| Dimension (mm) | 185×615 |
Applications:
| Water pipes | Air humidifiers | Nurseries |
Washing machines |
| Hot water cylinders | Water heaters | Industrial hot water boilers* | Wineries |
| Domestic boilers | Catering water boilers | Ice makers | Concrete/Crossflow |
| Coffee/vending machines | Beverage systems | Water coolers | Open/Closed circuit cooling towers |
| Shower heads | Coffee machines | Irrigation | Pressurized/unvented cylinders |
| Dairy processing | Car washing | Ice cubers | Commercial boilers |
| Air conditioners | Commercial water heaters* | Breweries | Pool heaters |
| Food and beverage-making | Dishwashers | Injection molding | Cooling towers |
| Toilets | Tea makers | Solar heating systems | Reverse osmosis pre-treatment |
How does WSNAC20 works?
Water contains two main types of hardness ions that cause scale. WSNAC20 resin treats both, the Cations, and the Anions in water. The scale-causing ions (dissolved limescale) pass through a bed of food-grade ceramic beads.
These ceramic beads convert the ions into non-scale causing crystals that flow harmlessly through your plumbing system and end up down the drain.
Scale into non-scale crystals
The crystals in the water are non-scale forming whilst also descaling, offering many benefits to the homeowner in its performance.
These special crystals once created (permanent), cannot form as hard scale on surfaces including heating coils and elements, fittings, or the inside of pipes etc.

In areas with high levels of water hardness, the crystals may show themselves as a white residue (soft scale) after water has evaporated. We recommend this harmless residue be simply wiped away before allowed to accumulate.
Additionally, a filtration of 10 microns is designed to significantly reduce any residue seen.
The chemical of WSNAC20
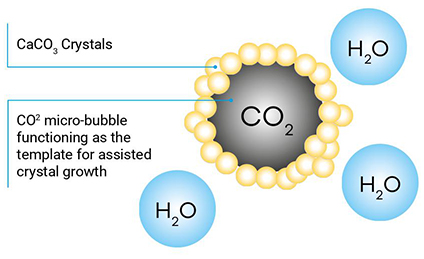
Once the amorphous particles reach the catalytic surface of WSNAC20 (2) they transform into carbonate crystals (1). Since the crystals are stable compared with amorphous particles, the process is not reversible, and crystals leave the FILTERSORB® WSNAC20 surface.
WSNAC20 formed crystals can sustain a temperature of up to 140°C, before a structural breakdown back to the calcite form. This property of the transformed hardness makes the treated water perfect for hot water applications and boilers.

During the flow, some of the micro-bubbles lose a small amount of CO2, which diffuses rapidly in water and interacts with surface scale, especially in closed spaces (pipes, boilers, etc). As a result, the scale which is already present on these surfaces is slowly softened and removed.
NAC via WSNAC20, is the only form of water treatment that can guarantee permanent crystal creation that will not revert back to the calcite form (scale creation). This together with its CBT ensures the longevity of the beads and performance.
Operational parameters & water impurities
| pH range | 6.5 to 9.5 |
| Hardness, max. ppm | 1400 |
| Salinity, max. ppm | 35000 |
| Iron, max. ppm | 0.5* |
| Manganese, max. ppm | 0.05 |
| Free chlorine, max. ppm | 3 |
| Copper, max. ppm | 0.3 |
| Oil | free |
| Hydrogen sulphide | free |
| Phosphates | free |

UNIQUE FEATURES OF WSNAC20
NO TDS CHANGE: WSNAC20 doesn’t alter water content; no ion exchange changes TDS before/after treatment.
NO PH CHANGE: The consistent pH makes the treated water suitable for nearly corrosion-free use.
MINERALS PRESERVED: WSNAC20 preserves water’s natural Calcium and Magnesium, creating exceptionally healthy mineral water.
DE-SCALING: WSNAC20 water not only prevents scale but also removes existing scale through crystal abrasion during water flow.
BIOCIDES: The NAC process forms CO2 micro-bubbles that both prevent scaling and act as a biocide by destroying bacterial membranes, preventing Biofouling.
CERAMIC BEAD TECHNOLOGY: Unlike other treatments, NAC involves self-assembling durable crystals on bead surfaces. WSNAC20 beads have a dual glass coating (CBT) for protection and performance.
| Model | WSPF20 |
| Description | 20″ white complete |
| Connections | 1″ F |
| Dimension (mm) | 590×124 |
| Model | WSPF10 |
| Description | 10″ white complete |
| Connections | 1″ F |
| Dimension (mm) | 310×124 |
| Model | WSPCD |
| Flow Rate (Lt/min) | 15 |
| Connections | 1/2″ F |
| Dimension (mm) | 100×190 |
| Model | WSBRF |
| Material | Brass, food-grade stainless steel, AS |
| Flow rate | 3000-8000 Ltr/Hr |
| Applicable water | Municipal tap water |
| Frequency Pressure range | 1-20 bar |
| Applicable temperature | 2-45 C |
| Filtration accuracy | 40-60 microns |
| Connection size | Outlet 1/2″, Inner 1/2″ BSP |
I. Installation and Precautions
This water purifier is used for household pre-filtration, usually installed behind the household water inlet main valve or behind the water meter, as shown in the figure.
The following installation instructions use a PPR pipe connection as an example of installation, and additional adaptor connections are required. Please let professional installers prepare. If the domestic water pipe is a metal pipe, the connection needs to be equipped with a corresponding external elbow according to the actual situation.
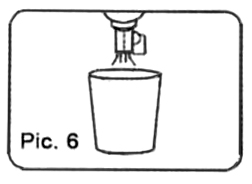
1. Determine the installation position according to the product size (at least 20CM height is reserved for sewage) as shown in Figure 6.
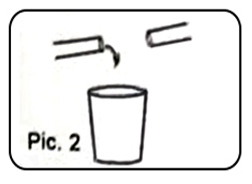
Close the water inlet valve, open the faucet in your home to drain water, and release the water pressure in the water pipe. Use PPR pipe scissors to cut a suitable distance at the installation position for installing the water purifier (the length of the pipe depends on the actual measurement), as shown in Figure 2, pay attention to the excess water in the pipe with a container.
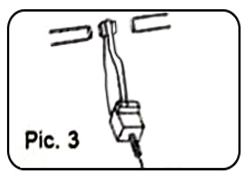
2. As shown in Figure 3, use the PPR pipe hot melter to connect one end of the cut PPR pipe, and weld the other end of the cut PPR pipe by the same method. Pay attention to the welding speed to ensure the welding quality. After cooling down for 2 minutes.
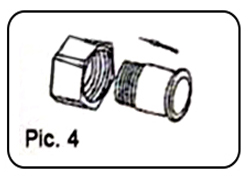
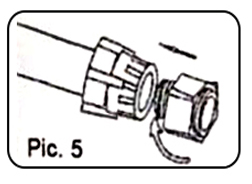
3. As shown in Figure 4, fully wrap the raw material tape on the external thread of the joint, and then tighten the wound joint assembly and the welded end of the hot melter. As shown in Figure 5, use the same method to process the other end.
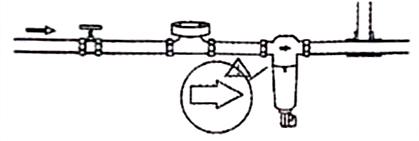
4. Tighten the joints at both ends of the water purifier with a wrench. Note that the direction of the water flow should be the same as the direction of the water purifier, as shown in Figure 7.
5. Slowly open the water inlet valve, and turn off the water faucet after the household faucet can discharge water. Pay attention to check whether there are leaks or slow water seepage at the connection between the various parts of the water purifier. At the same time, you can open and close the drain valve multiple times Drain the water and observe it carefully. If leakage or water leakage is found, immediately check whether it is tightened (recommended observation time is more than 5 minutes).
II. Installation Precautions
1. The installer should check whether the parts are normal before installation.
2. This water purifier is not easy to install outdoors, and it should be as far away from ultraviolet rays, heat sources, fuel oil, and various chemicals as possible.
3. When wrapping the raw material tape, fully and evenly wrap it.
4. When tightening with a wrench, make sure that other parts do not rotate with it.
5. After installation, carefully observe whether there is leakage or water seepage.
III. Instructions
1. Simple rinse
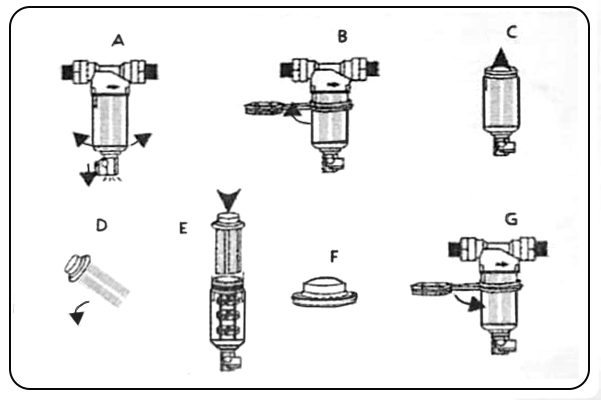
After the installation is completed, open the water inlet valve, and the water filter starts to work normally. After the water purifier works for a period of time, the customer can clearly see the impurities filtered by the filter through the transparent cylinder. If the accumulated impurities affect the time of the water outlet and the pressure of the domestic water equipment, the filter of the water purifier can be cleaned. As shown in Figure A, with the drain valve open, turn the cleaning knob left and right to wash and discharge filtered impurities. (Note: first open the drain valve body, and then rotate the cleaning knob)
2. Cleaning impurities
When the filter screen accumulates some sticky impurities, which cannot be cleaned by normal cleaning methods and affect the water output and pressure of domestic water equipment, as shown in Figure B Remove the transparent cylinder with a wrench and take out the filter assembly (see Figure C). You can use a cleaning solution or a brush to clean the impurities on the filter (Note: Do not use strong acid or alkali cleaning solution).
As shown in Figure E. Put the cleaned filter assembly back into the transparent cylinder assembly. Note: Insert the filter assembly into the two grooves on the cylinder (see Figure F). Tighten the copper parts with a wrench (see Figure G).
IV. Attention
1. This product is mainly used as a pre-filter for municipal water and drinking water (municipal tap water)
2. This product should not be installed outdoors or placed in direct sunlight to prevent freezing or water temperature greater than 45 °C
3. Install the product in a location that is easy to clean and maintain.
4. Avoid the following damage, such as collision, freezing, overheating, chemical contact, hammering, etc.
5. In the normal cleaning and maintenance process, pay attention to protect the integrity of each component.
IV. Fault solution
| Phenomenon | Cause |
| No water out |
|
| The outlet water flow is small |
|
| There is water seepage at the water purifier connector |
|